Let's get the CNC machine running!

If you haven’t noticed, there’s a big new CNC machine that took up residence recently in the woodshop. There are a lot of tasks we need to do to get it going, and things we still need to figure out.

I want this to be a community effort, and not a top-down operation. You don’t have to wait for someone to say it’s ready to use if you’d like to help get it going.

Here are a few things we need to do (not necessarily in order). For reference, the machine is oriented 180 degrees from the old one. The operator will be at the foot of the machine, just inside the woodshop doorway. That side of the machine has “Smart ER Series II” on it. The “head” side has the tool holders and is yellow. Left and right are with respect to an operator standing at the foot. The lathe spindle is along the left side.

Repair and re-install the leveling foot that broke. There’s a green leveling foot that needs a 1/2"-13 stud. It goes on the left side of the main bed.

Level the machine.

Reposition the control cabinet and re-route the cables. The cabinet should be at the right corner of the foot. The control cables (the large and small black ones) can come out from under the right half of the foot edge. The power cables (the large and small gray ones) can run down the lane between the machine and the wall.

When using the lathe spindle, the cabinet can roll out to the left corner of the foot. We need the cables out of way so they’re not a trip hazard, and it should be easy to reposition the cabinet.

Locate the vacuum pumps. There are two big vacuum pumps on the head end that connect to the heavy black hoses. They’re on a pallet now. I assume they are loud, and they could maybe mount on rubber pads, and maybe we’ll want an enclosure or sound baffle.

Locate the air drier and get it connected. The machine needs compressed air to run. There’s a blue dehumidifier/filter unit that goes at the head. We’ll need to splice a connection to the air hose in the ceiling. The existing air hose reel is now up at the head. That can be repositioned so it’s accessible from the operator at the foot.

Figure out dust collection. The machine came with a large cyclone-style dust collector, BUT I think that’s going to become the main woodshop collector, and the current dust collector on the table saw will move over. We need to check with Charlie and see what he wants to do. There is ducting / flexible hose and retracting cable reels.

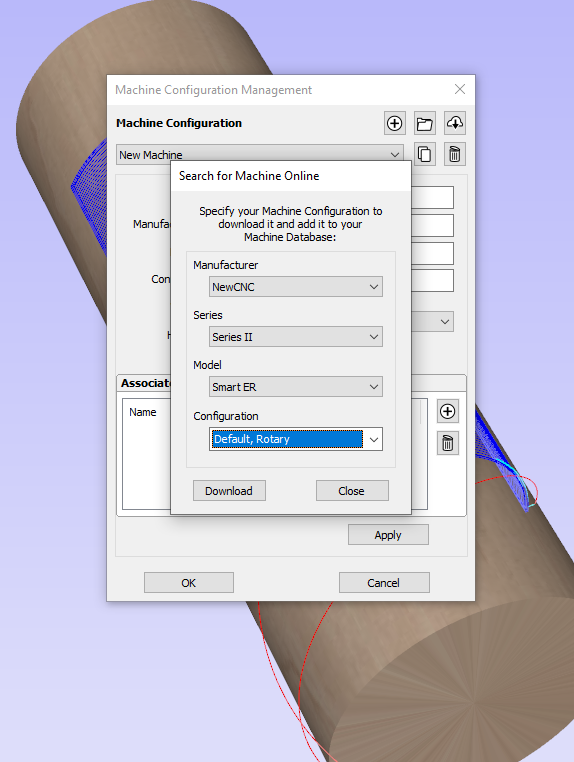
Figure out the software. There’s a few aspects.

  • The controller doesn’t run Mach3; it’s OSAI OPEN Control. I have begun to compile manuals. In the break room bookshelves there is a large white binder with some things I found.
  • We’ll need to install and test the appropriate post-processor for V-Carve.
  • What can we use for lathe work? I don’t know yet.

Update the S.O.P. and figure out the checkout process. Having an automatic tool changer is an exciting new development, and we should take advantage in the sample project.

I think this is a good start. With the holiday next week, I’m taking the whole week off, and will be spending plenty of time there.

3 Likes

Just renewed my membership yesterday with the CADL pass and saw the new machines! I was planning on being by the space whenever I had time and would love to help get this bad mamma jamma up and running. Some of these tasks are definitely easier then others but im down to help in whatever ways possible. Ill probably be by today and take a closer look at some of the things mentioned here.

I’ll be in some this week as well to assist. With the leveling foot - is it a welding or machining repair? I can probably handle machining a new stud. I can also bring my laser level and do the actual leveling.

Edit: I took a look at the missing piece and I think I have appropriate hardware on hand to replace it on Wednesday.

Regarding software for rotary work: The post processor for V-Carve allows you to select “rotary” as an option when downloading. Obviously it will need to be tested, but it seems to be there.

I spoke with Carl yesterday and we were talking about the best method to move the cables and we agreed that lifting the corners of the table with a pallet jack and sliding them under would be the most efficient way. That being said we would probably want to do that before leveling the machine as it would tweak it for sure. Ill be in on Saturday.

1 Like

Tagging @gkelley to help as well. We talked this weekend and in his career, he helped to build and setup similar machines.
Gary- would you be able to assist in any of these areas?

1 Like

At the risk of some annoyance, I think the machine needs to get moved about 18-24" further down the wall, which is no simple task.

The yellow safety arms on the gantry extend about 15" beyond the spindle. When the spindle is at 0,0 the arms extend past the foot edge of the machine. If the cabinet is down there and too close, they’ll crash into it. I think asking everyone to remember to move the cabinet out before starting and then move it back so it’s not blocking the doorway is just a crash waiting to happen. If we can shift the machine, the cabinet can stay in one place, at the right foot, and not block the doorway, almost all the time. When using the lathe spindle, it can get pulled out to the other corner.

We could keep the box to the left of the lathe spindle. but that’s intruding further into the main aisle, and there’s still a crash possibility if it’s too close.

We have two pallet jacks, but that’s only sufficient to lift up a corner or one end to shift cables around. We would need machine skates to move it. Possibly we could roll it on steel bars, which we have.

Does anyone have skates, know someone to borrow from, or find a rental place with them for the day?

Sunbelt has this set for $55/day. I also know a couple people to ask who might have some they’d loan.

Edit: My colleague didn’t have a set of skates, but recommended just using pipe/round bar for a small straight move like we need. I think we could even put some under just the head and carry the foot with the pallet jacks. A pinch bar could be useful as well.

I might be able to, it depends on how my new job is going.

Would two more pallet jacks (4400, 5500 pound) do it? If so, can bring to help move tomorrow (up north rest of week).

That could do it. It’s only moving a short distance.

Ok I’ll be there in a couple hours

1 Like

Hey @RealCarlRaymond I’ll be in around noon today with that wrench and a stud for the broken foot.

1 Like

We got the machine moved a bit, fixed the broken foot, and then leveled it. Big thanks to Jody, Blake and Henry for their pulling and shoving skills, and to Ryan for lending us some extra pallet jacks.

There’s a lot more room for the control box, and the cables have been shifted around under the machine (with some help from a late-night elf, possibly named Ryan). Right now Blake is on a ladder moving the air hose reel to a better place. It will be more accessible to the front end of the woodshop area, as well as to the machine operator. In all some nice progress today.

4 Likes

It’s got air!

@RealCarlRaymond I’m going to go ahead and email NewCNC about a user manual. I doubt we will hear back until next week.

Here is my idea for work holding on the new CNC. It’s mainly inspired by the idea that the vacuum hold down system is great for cutting large parts out of full sheets, but is easily compromised by wear to the spoil board, and is not well suited to small parts, engraving etc. So I think for our purposes, we should have a clean spoil board available for people who want to use the vacuum system, with a modular layout of secondary boards on top. It would consist of:

  • Existing phenolic plenum bored and tapped with some 1/4-20 blind holes to hold main board in place without vacuum.
  • Main 5ftx10ft spoil board surfaced flat and stenciled with “No Screws Allowed” and with evenly spaced 1/4-20 inserts.
  • Smaller sacrificial spoil boards:
    • Blank for use with screws
    • T-slot or dovetail for clamps
    • Threaded insert pattern
  • Nylon screws to hold everything together (might save tools when crashes happen).

Let me know if anyone has suggestions.

Main Board:


Workpiece Held by Vacuum:

Workpieces Held on Modular Boards:

Clamping:

4 Likes

Incredible work. Thanks for the effort involved in making this pitch.

Does anyone already have a plan for dust collection? I was taking stock of what we have and trying to figure out how to arrange things. Here is what I think is the best option based on what we have since the ducting that came with the cyclone is quite expensive ($80 per 5ft, $200 per elbow).

  1. Set up new blue cyclone collector behind the panel saw.

  2. Run 8in quick connect ducting from cyclone to location of current dual bag collector.

  3. Build a rack for the CNC vacuum pumps and air dryer to make some room. I have a rough design for this out of framing lumber and plywood.

  4. Set up the dual bag collector next to the CNC. Run 6in hose up the wall and support for CNC motion.

Alternately, we could set up the cyclone next to the CNC and just use it for that, but it does seem like with how much use the other equipment gets vs the CNC, it might be nice to have the bigger system there.

If anyone has a plan already or any thoughts let me know. I can meet this weekend to plan if further detail. I was hoping to start building the rack for the pumps as well.

@TEAM_Woodshop @RealCarlRaymond @cafwood

1 Like

Thanks for thinking about this. I do have some plans for dust collection but am interested in hearing more about your ideas. I will be in tomorrow for a while getting ready for Sat. class.What days or times are you typically there?
Charlie

I have the day off so I can be there any time. I was planning to be there around noon for a while.